
How To Make A Simple Game In Waterbear
Making a game can be hard. There’s so many pieces inside of the simplest game that trying to do it with no prior experience can be near impossible. That’s why I am making this guide. A tutorial can help you tackle this challenge. I will be making the game of pong, but if you want to make another game you can easily take the lessons here and apply it to your project.
I assume you have some familiarity with the waterbear language, enough to know where to find blocks and how to use them. I will be showing the script as I create my game.
If you are having any troubles, you can see what the end result is by clicking the Simple Pong example on the waterbear site.
Make Some Pieces
In this game of pong, there will be 2 blocks on the left and right side, and a pong somewhere between them. This part we will create two blocks and a rectangle.
Start with making a player block. To make this follow these steps:
- Grab the sprite with block and drop it on your script.
- Sprites are images or shape that can move, spin, collide, and other neat stuff.
- Now grab the rectangle block and drop it into the sprite with block.
- We are going to make our sprite a rectangle.
- Add the properties to the rectangle block.
- Place a zero vector <0,0> into the first property.
- Put a width of
20. - Make the height
100.
- Make the name of the block
player 1.- Now, whenever you are using the variable
player 1, it means this sprite.
- Now, whenever you are using the variable
You should have the below now. Now do the same thing except for player 2.
![]()
For the pong, do the same as above except for a rectangle block, use the circle block and give it a radius of 20.
You should have this now,
![]()
Place the Pieces
Now that you got your players and pong, you want to place them in the right spots.
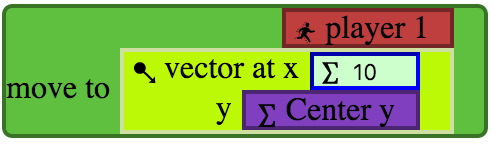
To give player 1 a starting position on the left side, do the following:
- Grab the move to block from sprites list and drop it on your script.
- This block is how we tell sprites where to go.
- Now grab the
player 1variables and drop it into the move to block.- This mean we are telling the rectangle sprite
player 1to move to somewhere.
- This mean we are telling the rectangle sprite
- Grab a vector at block from points list and drop it into the move to block.
- Put
10into the x coordinate . - Put the Center y block into y coordinate.
- Now
player 1will now be placed on the left side in the middle.
- Now
- Put
You should have this now,
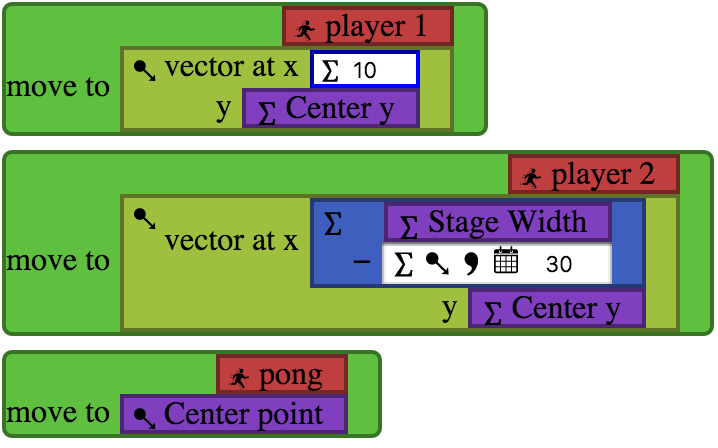
For player 2, you’ll want to do the same as above except for the x coordinate. Since you want player 2 on the right side, you’ll need to grab some more blocks:
- Grab the - (minus) block and place it into the x coordinate.
- Place the Stage Width block in the first spot for the - (minus) block.
- Enter
30into the second part of the - (minus) block.- Why I put
30into the second part is because I want the block to be10away from the right side, and I need20because that’s the width ofplayer 2.
- Why I put
For pong, do the same as player 1 but at step 3 just use the Center point block instead. Because I want it to start in the middle.
You should have this now,
Display those Pieces
So far your script does a lot behind the scenes, but you aren’t seeing anything from your hard work. Let’s change that.
- Grab the each frame block from the Controls list.
- This block is how we update the game. Every time we start a new frame, we go through all the blocks in here.
- Now take a clear to block from the Stage list and place it into the each frame block. Use the default black.
- This block will clear your game area on every frame so that old stuff is removed.
- Grab two fill style blocks from Colors list under the clear to block and in the each frame block.
- One fill style will color your players and the other the pong.
- Give them whatever colors you want.
- Now grab three draw blocks from the Sprites list. Place two of them under one of the fill styles block and the third under the other fill style block.
- The sprites under one fill style will have a different color than the sprites under the other.
Now you can hit run and see this,

Congrats! You can see the start of your great game!
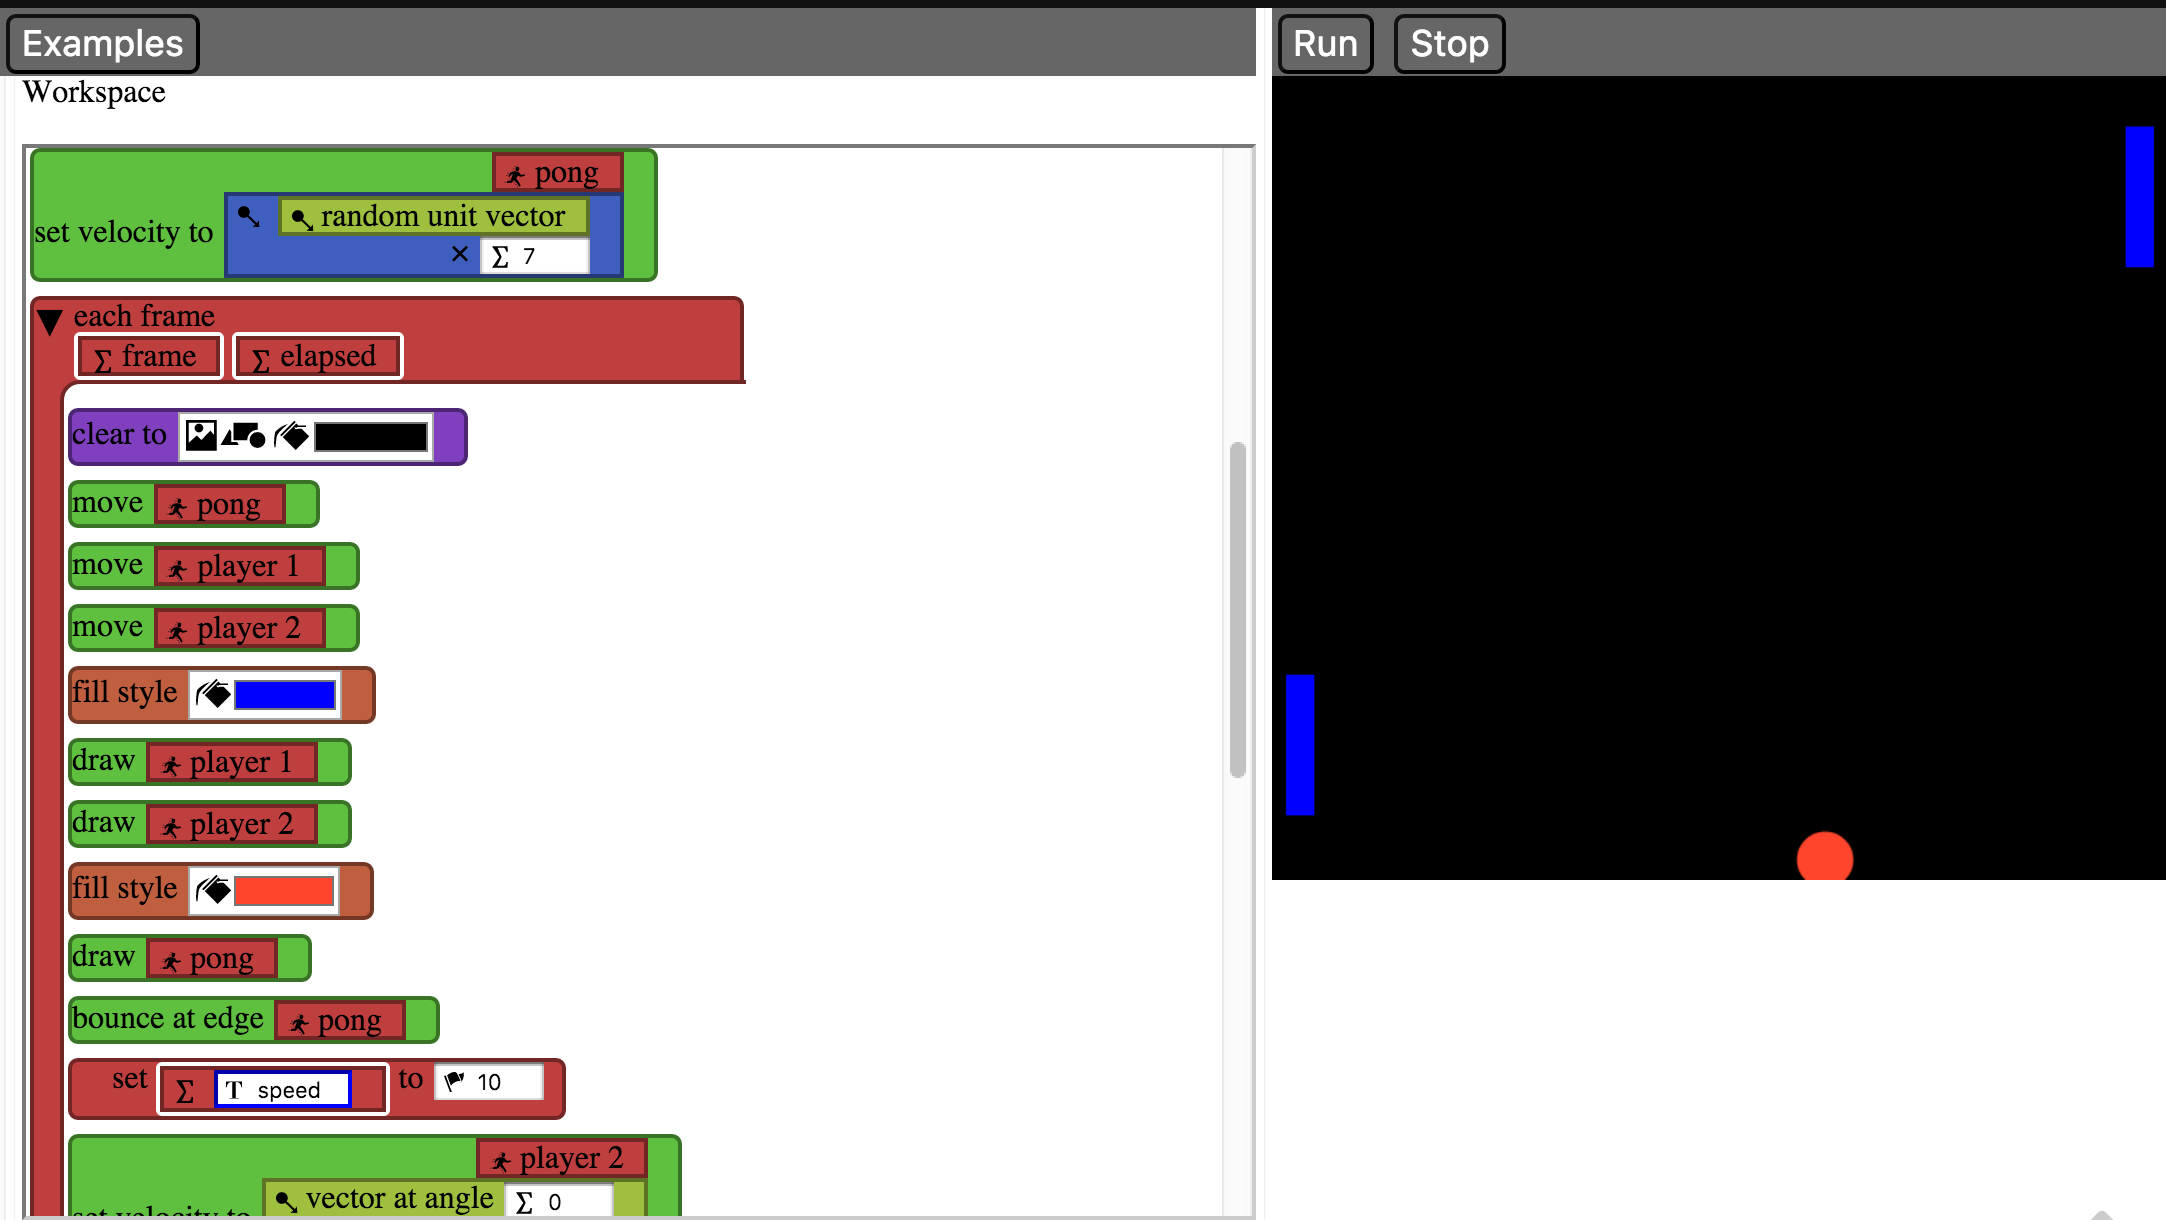
Moving pieces
Now lets get to the fun stuff. At the moment, your game is really just a cool picture.
Moving the Pong
You have to get the pong to move around. Luckily, that’s pretty easy to do in waterbear. You’ll need three following blocks:
- Grab a set velocity to block and place it before the each frame block.
- Place the
pongsprite into the first part. - Grab a x (multiply) block from the Points (Vectors) list.
- Place a random unit vector block into the first part.
- Give the second part a number, the higher the number, the faster the pong.
- This will tell the sprite to move in a random direction with a certain speed you give it.
- Place the
- Grab the move block from the Sprite list and place it after the clear to block.
- Place the
pongsprite into this block.- This will update your sprite to move at the speed and direction you gave it above. Your pong will not move without this.
- Place the
- Also put a bounce at edge block from the Sprite list at the bottom of the each frame block.
- Your pong will fly of the board without this.
It should look like this,
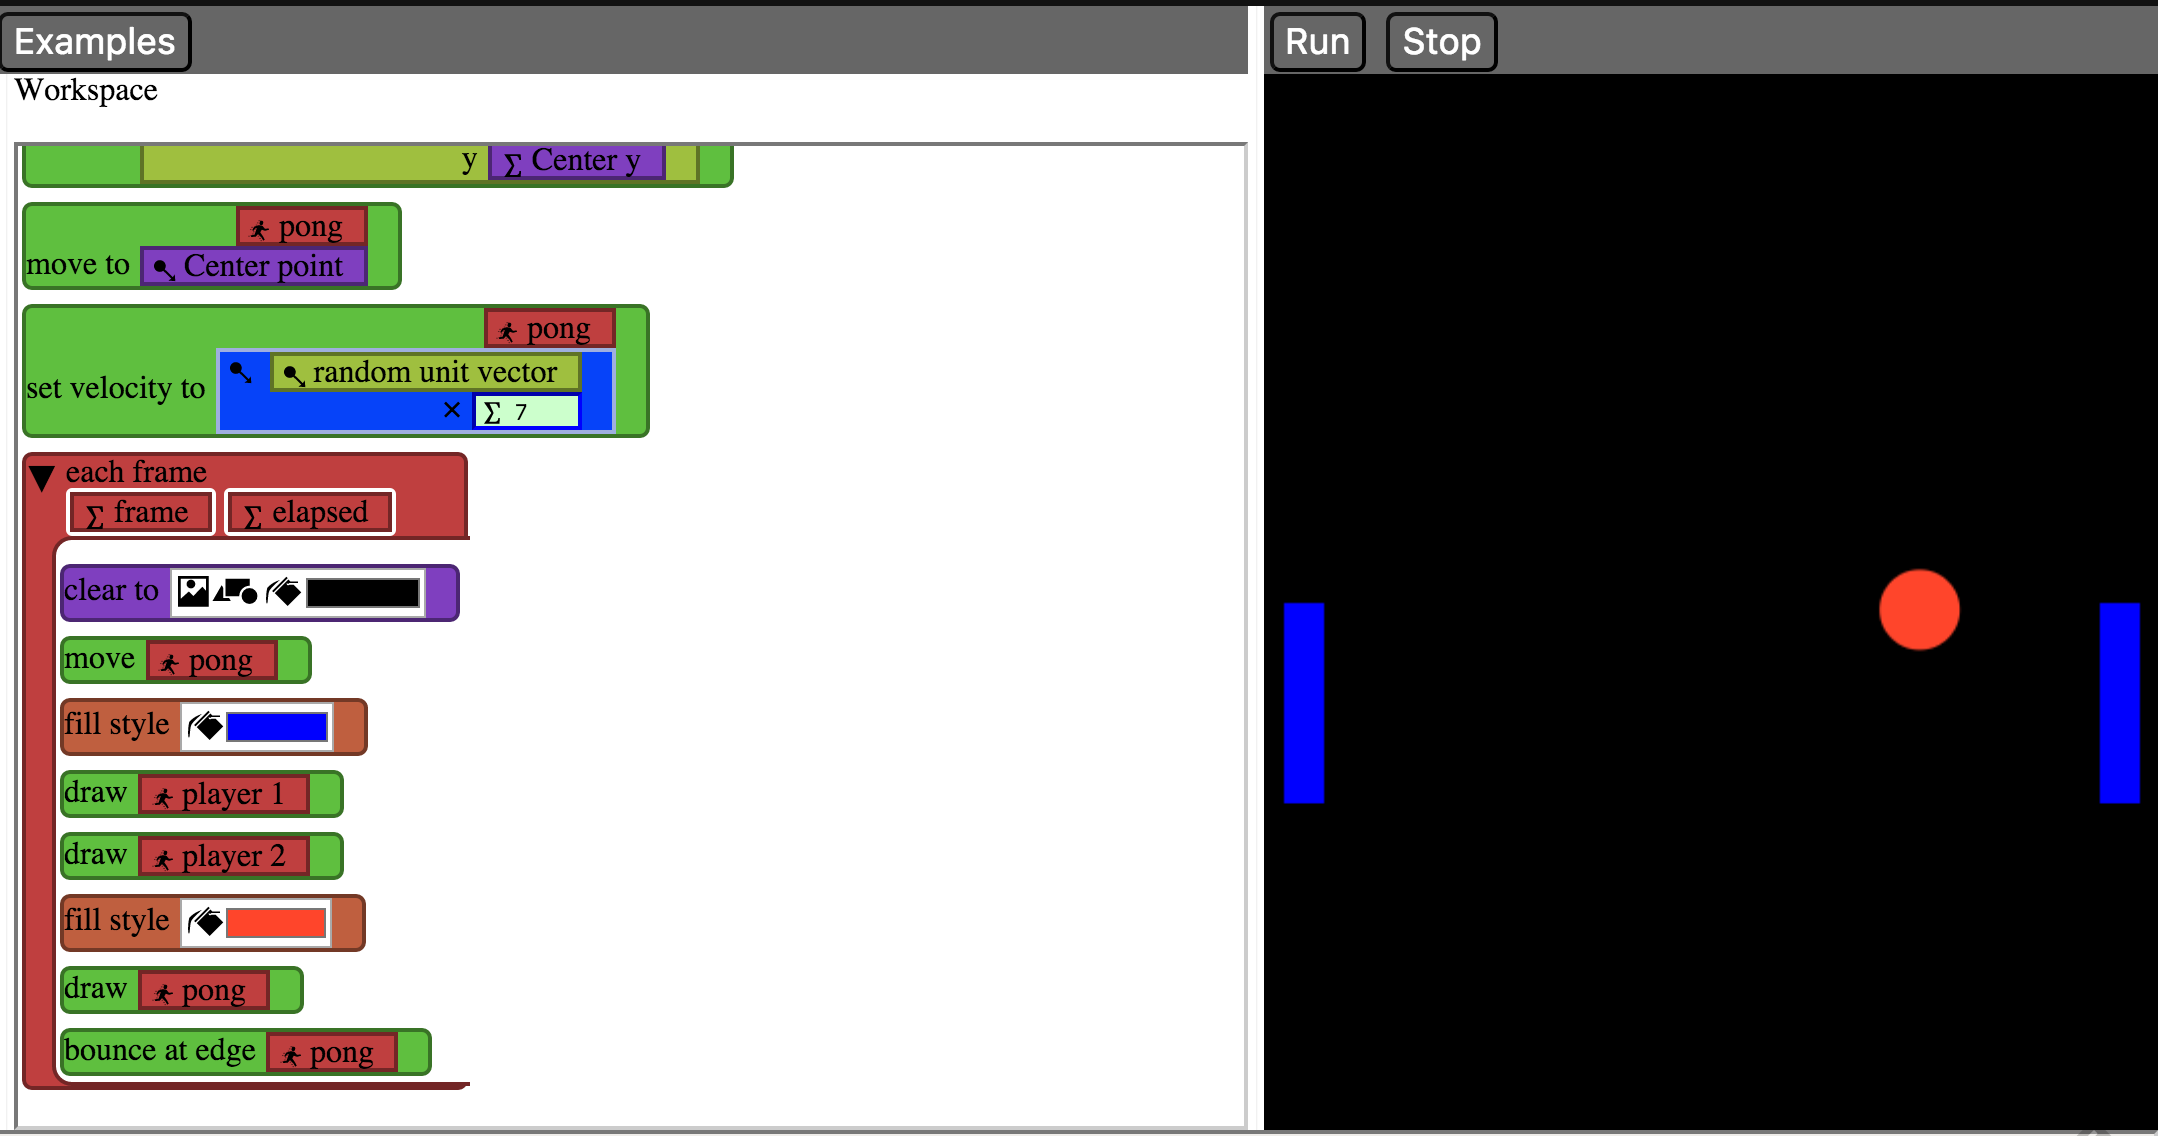
Hit run to see the pong flying all over the place!
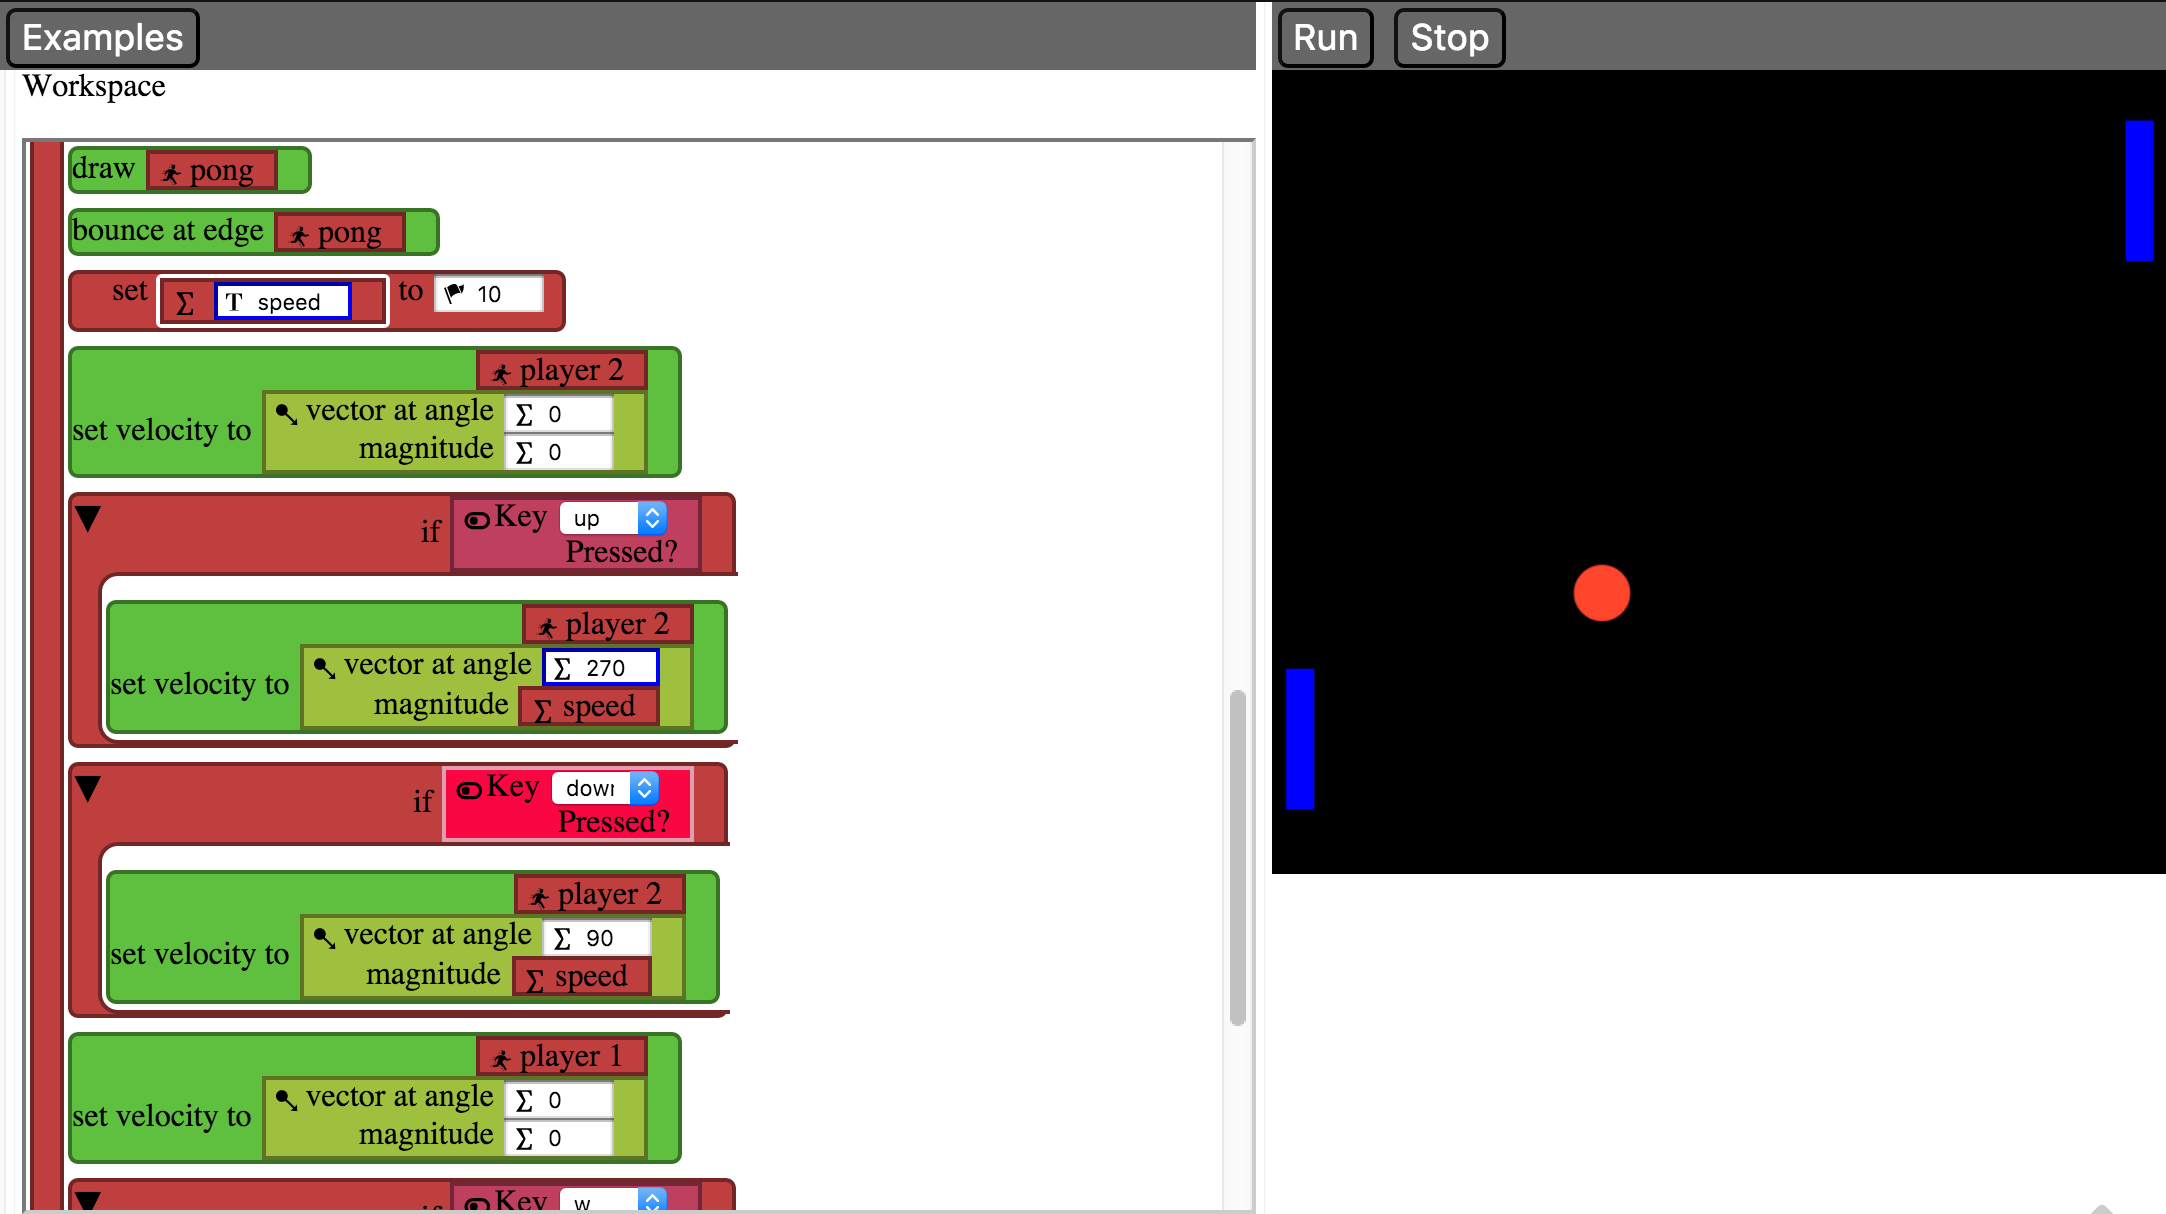
Moving the Players
With the pong, we can just set it’s velocity and leave it. Players are a little different. They should only move when we tell them. Luckily, there’s a few blocks designed just for that.
Follow these steps for moving player 1 around:
- Grab a
setblock from the control list and place it after the bounce at edge block. Give it the namespeedand give it a number; I gave it the number10.- This will determine how fast a play can move.
- Get a set velocity block from sprites list and drop it after the set block from step
- Put
player 1in the sprite part. - Grab a vector at angle block from the points list and place it in the points part.
- Give it an angle of
0. - Give it a magnitude of
0.- This block will be used to stop moving your block unless you tell it to.
- Give it an angle of
- Grab an if block from the control list, and place it after the block in step 2.
- Grab a key pressed? block from inputs list and drop it into the if boolean spot.
- Which input key do you want
player 1to move on? I choosew.
- Which input key do you want
- Now do the same as step 2 above, where we set the velocity of player 1.Except, this time we are going to tell the
player 1to move up.- Give it an angle of
270, which means up. - Give it a magnitude of
speed.- The if block means that only when something is true, the block in there will be used. In this case, if you are pressing on the key
w, theplayer 1will move up.
- The if block means that only when something is true, the block in there will be used. In this case, if you are pressing on the key
- Give it an angle of
- Put
- Now do the same thing in step 3, except we want
player 1to move down.- Change the input key to something different that above. I did
s. - Give it an angle of
90, which means down.- This block will tell
player 1to move down when the player is pressing theskey.
- This block will tell
- Change the input key to something different that above. I did
- Now if you remember from getting the pong to move, it is very important that we grab a move block from the sprite list, and place it after the the move block for pong.
- If you skip this nothing will happen.
Now you should have these in your program.
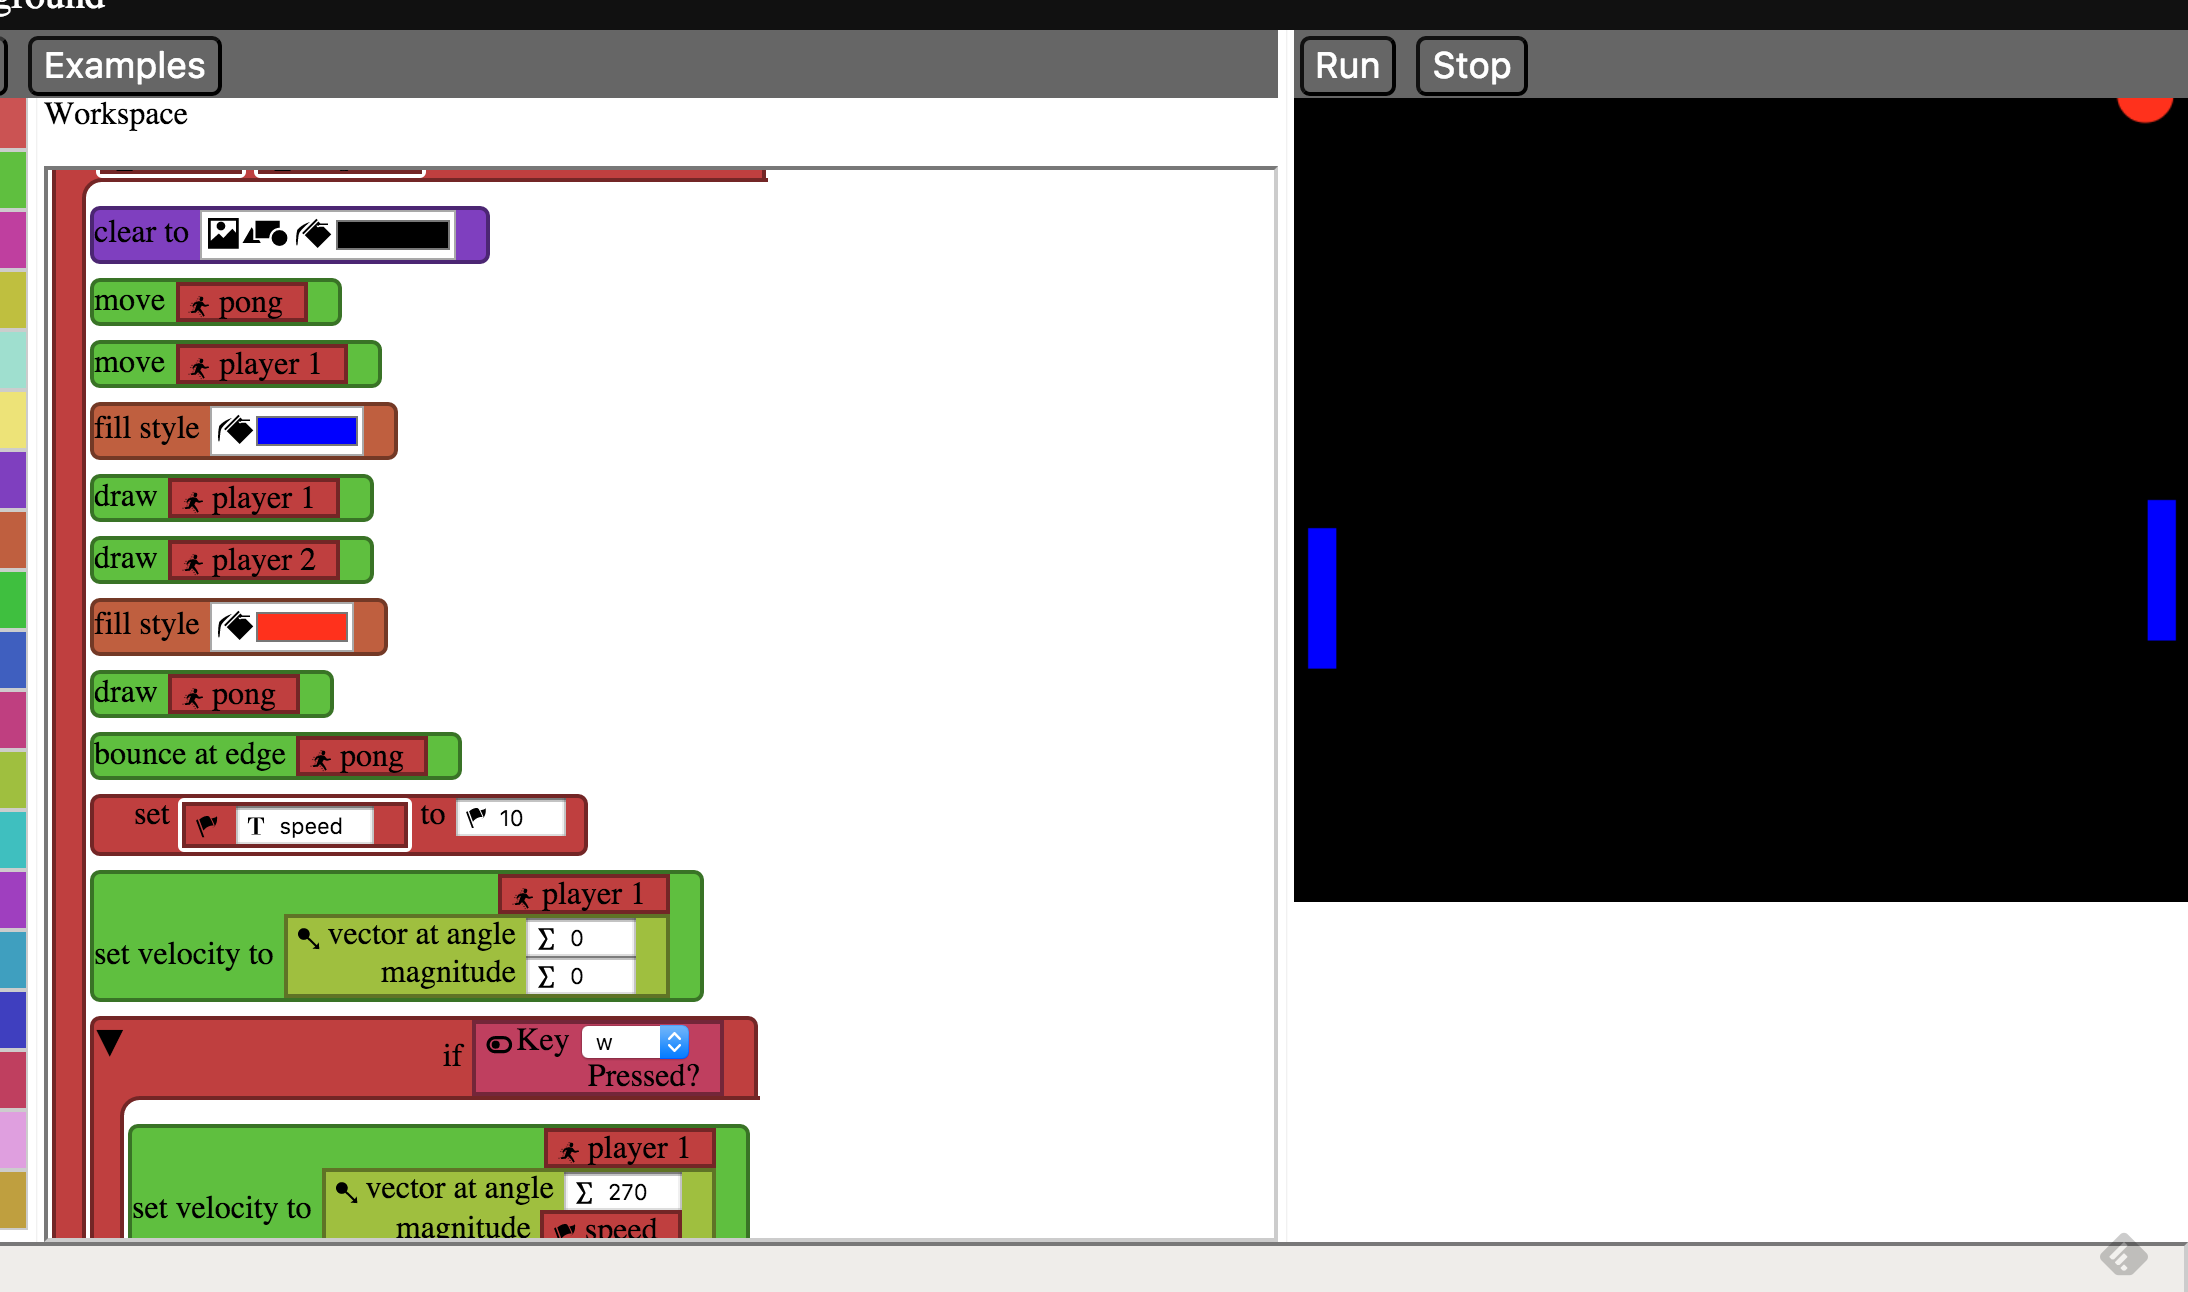
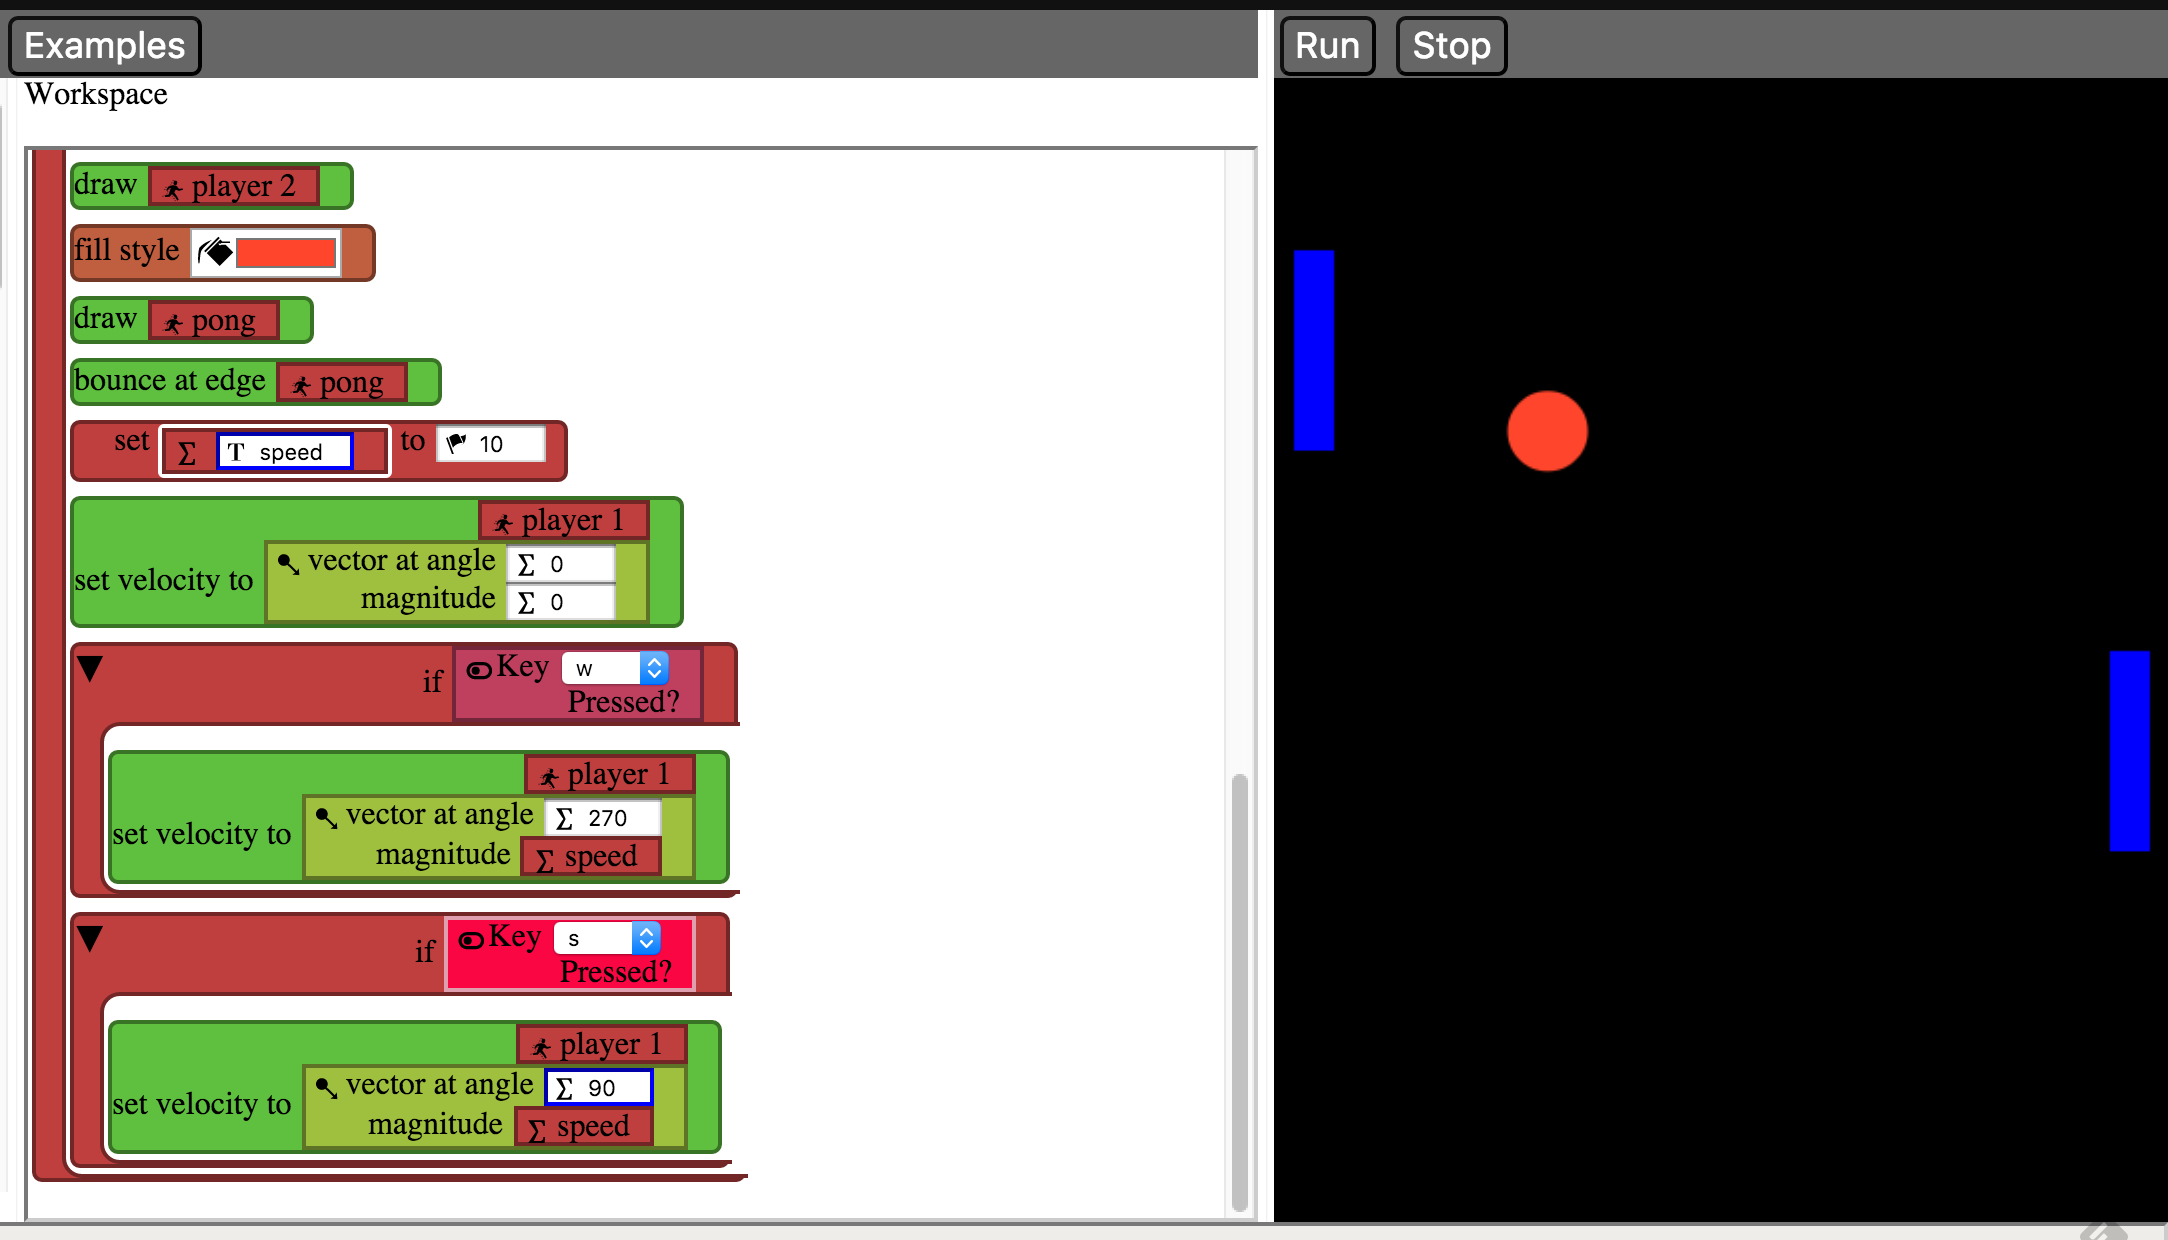
Now hit run and press w and s and see player 1 fly up and down.
You’ll want to do the same thing for player 2, but pick different keys. I used the up and down keys.
Bouncing Pong off Players
Now you got a great game that moves around, the pong goes right through the players! That’s no good. Let’s change that. In the game of pong, when the pong makes contact with the player, it should go in the opposite direction. So let’s make that happen.
- Grab another if block from controls list and place it at the bottom of the each frame block.
- You’ll want to grab an is collision block from the sprite list and place it in the boolean slot in the if block.
- Put
player 1in the first slot. - Put
pongin the second slot- This will tell the if block to use the blocks inside if
player 1andpongsprites are touching.
- This will tell the if block to use the blocks inside if
- Put
- Take the degree block from the math list and place it at the start of the if block.
- Grab a get velocity block from sprites list and place it in degrees block.
- Put
ponginto get velocity block.
- Put
- Call the set block
degree.- This block tell you the angle the pong is at when it collides.
- Grab a get velocity block from sprites list and place it in degrees block.
- This part is a bit confusing, but just trust me on the math. We want the pong to bounce off the player, so we need to give it a different angle. This is the calculating I’m using
180 - degree. This should mirror the pong’s angle.- Grab a - (minus) block from math and place it after
degree.- Put
180into the first part. - Put
degreein the second part. - Call this block
angle.
- Put
- Grab a - (minus) block from math and place it after
- Grab a set velocity block and place it after
angle.- Place
ponginto the first part. - Grab a vector at angle block from vectors list and put it into the second part.
- Put
angleinto the first part. - Give it a magnitude you want, I choose
7.- When this blocks is used, your
pongwill go in a different direction.
- When this blocks is used, your
- Put
- Place
- You’ll want to grab an is collision block from the sprite list and place it in the boolean slot in the if block.
This is what it should look like.
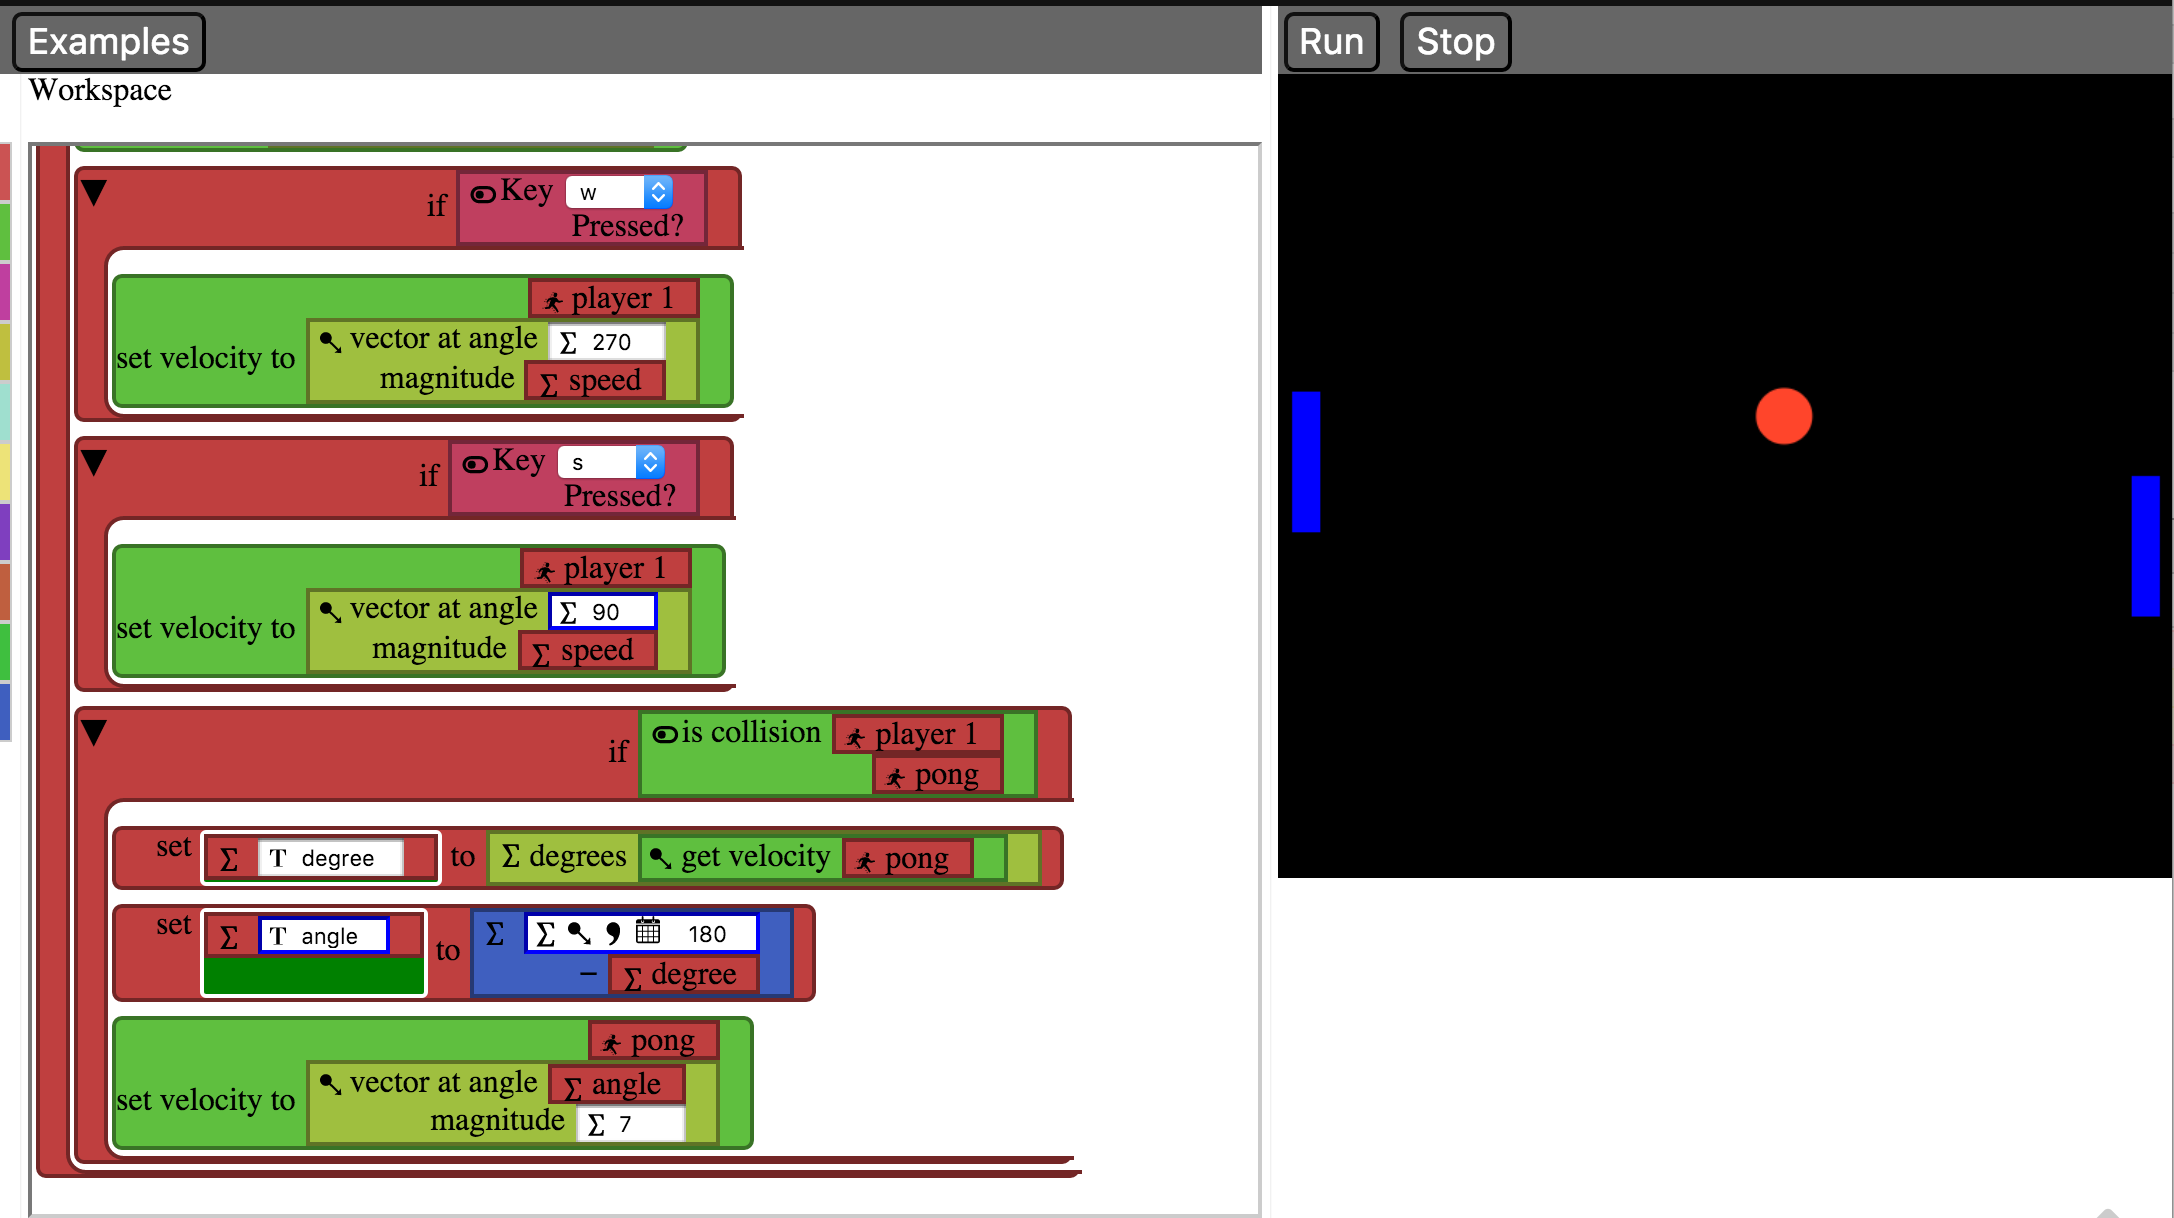
Try it out, and you’ll see that the pong doesn’t go through player 1 anymore.
For player 2, the math is the same. So it makes sense to run the same if block for pong colliding with player 1 for player 2. Instead of making a nearly identical block, just use a conditional statement.
- Grab the collision block in the if block and place it somewhere out of the way.
- Grab an or block from the boolean list and place it into the if block.
- Grab the collision block you set aside and place it in the first or slot.
- Take another collision block from the sprites list and place it into the second slot.
- Put the
player 2sprite into the first part. - Place the
pongsprite into the second part.- We are using this or to say we use everything in this if block if either collision after.
- Put the
It should look like this now.
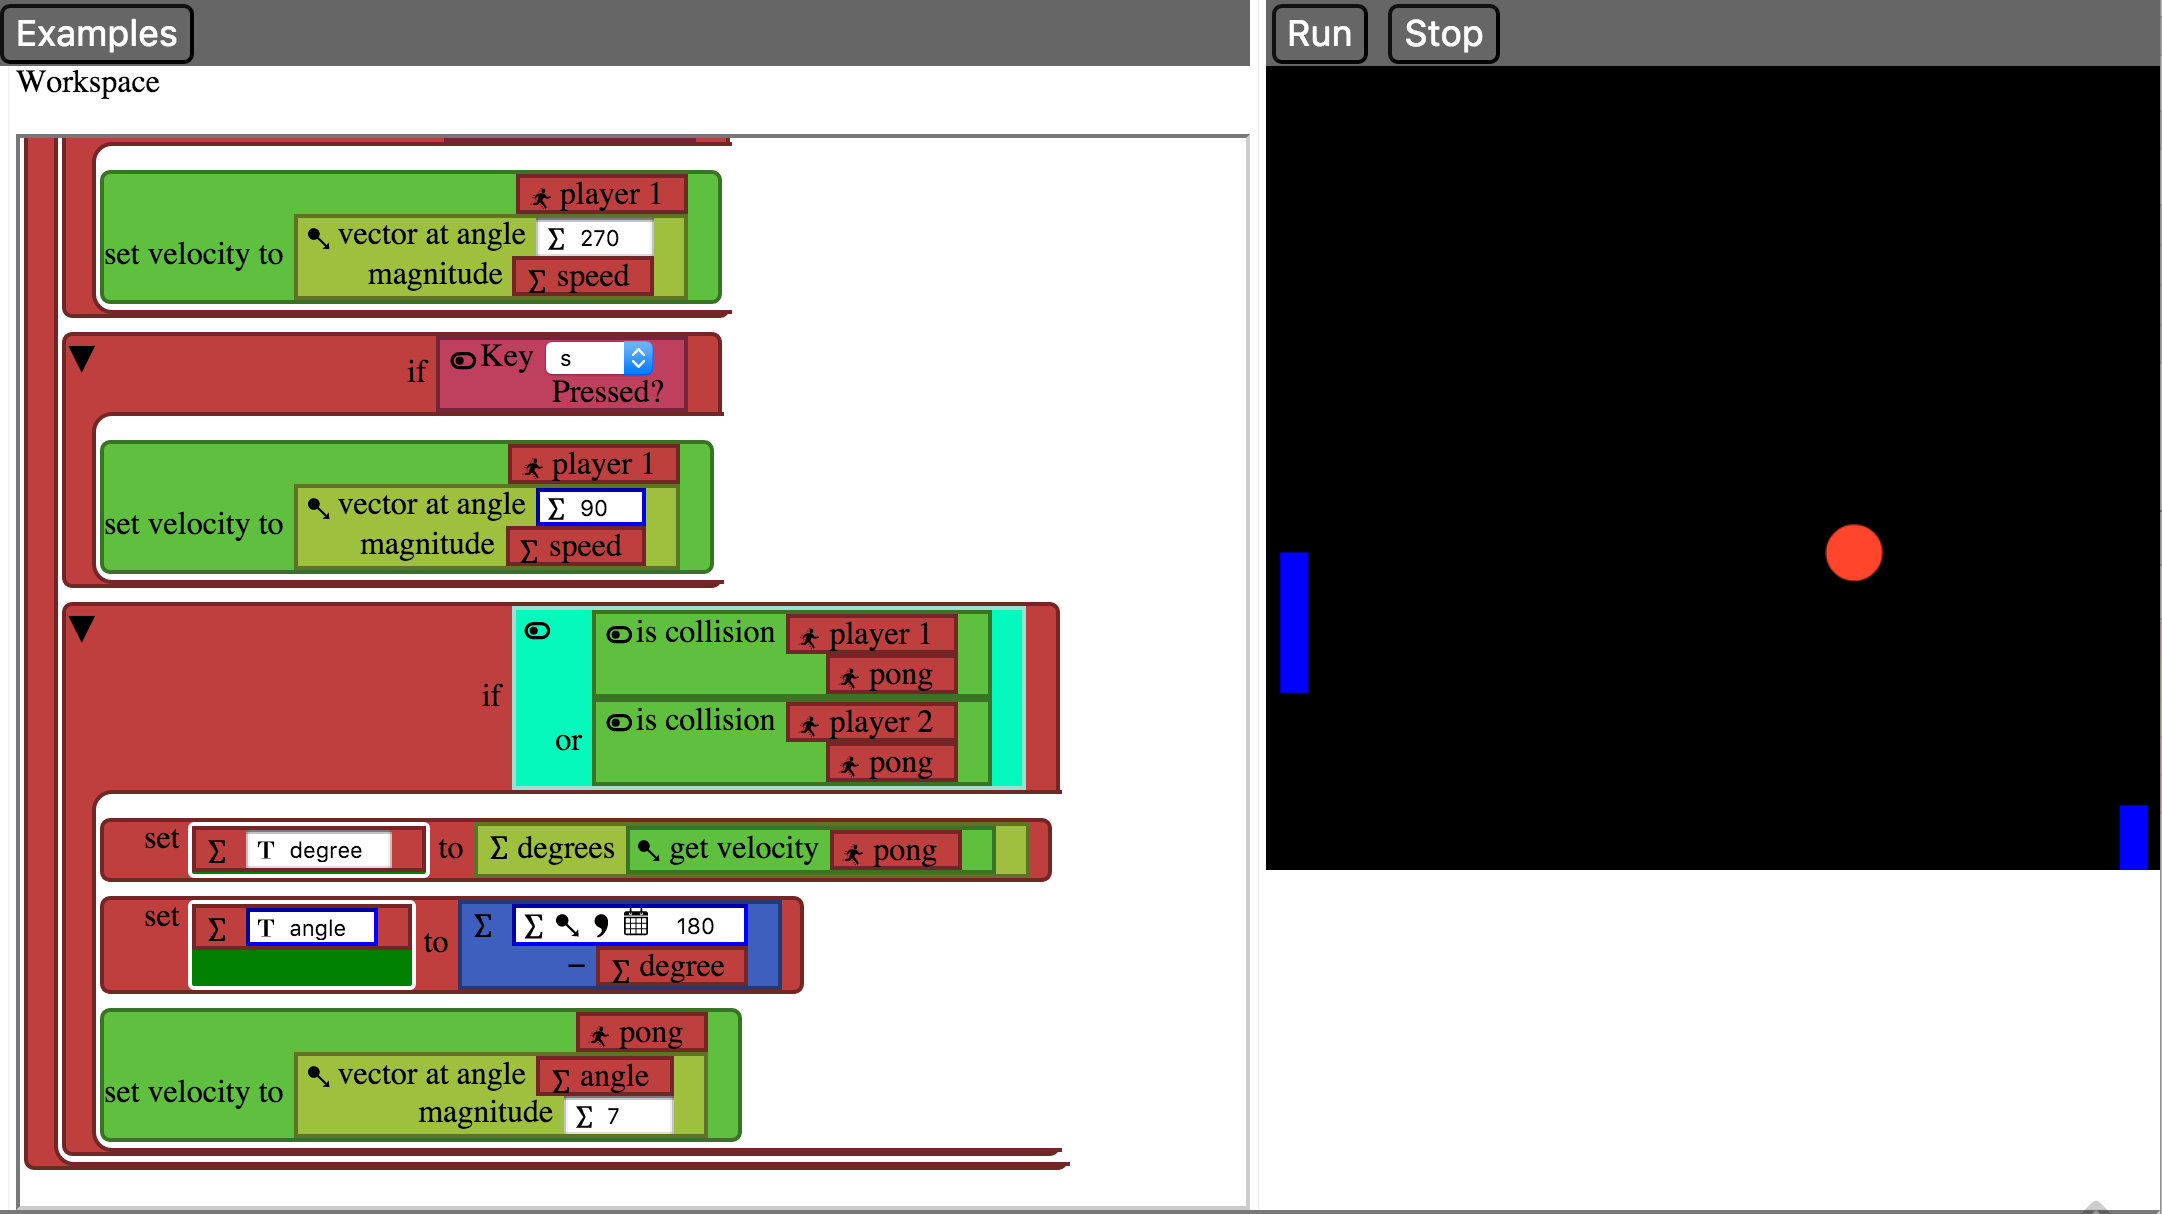
So now, collision will happen whenever the pong hits either player.
Fin
That’s it! You made your own game of two player pong!
Now the best part is that you can add your own magic to make the game even better. You can make it so that the pong goes a faster overtime. You can add a scoreboard. You can add whatever you can think of!
–Sam