
Working with Waterbear Blocks
I figured now that I have been working with waterbear for a few weeks it was time for me to write a blog detailing how waterbears block structure works. When I first got into working with waterbear I found it quite daunting to figure out all the steps a block has, from creation to where the code for the block runs. I will be going through a simple example that you can feel free to add to the open source code that is available at github.com.
Lets start with the basics: how a block gets created in the html. Each block is held within its own special menu. To create a new section in the menu you simply need to follow the framework that is already there. It looks like this.
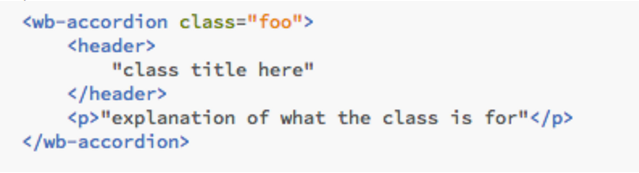
Some of these tags you may have seen before. <header> and <p> are pretty standard and are used here because the structure is quite intuitive. <wb-accordion> is a new creation of the waterbear team though. This is basically just a wrapper that creates the fancy little button with the action to show all the blocks when its clicked on. This little piece of code we have can get slotted in the sidebar section of playground.html. Thats the menu you see on the far left of the website. Now that we have our menu section we can start to add all our cool new blocks to it.
There are many different types of special elements that are available within waterbear. The main ones are wb-context, wb-expression, wb-step and wb-value. There are also special cases such as wb-row for the array class. The blocks are built from the javascript so using these special elements will give many of the necessary elements needed for the blocks. For example, wb-step are the blocks that are used in a single instance, such as printing an element or setting the velocity of a sprite. By using this element type we can create a simple block like this one.
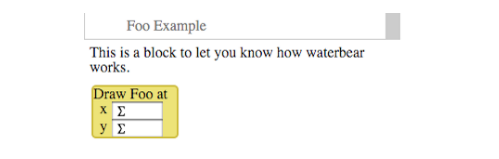
We now have a our nice new foo block within the menu we just created. The code below is for the block above. Like I mentioned before applying attributes to the special elements formats everything for you. In this case giving the wb-value the type of number the block is given an input that takes numbers and is formatted like all the other blocks. This includes things such as adding the icons to le the user know what type the input is (i.e. number, sprite). This allows us to keep our html really simple because all of these details are added by the css.
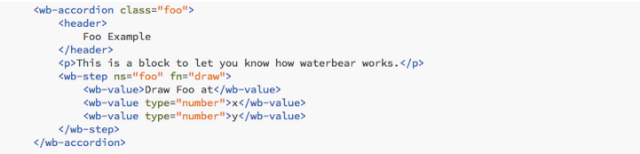
Now we have a shiny new block but it doesnt do anything yet. Within the wb-step there is an attribute fn. This is the function that will run when the script is converted and run. We haven’t created this function yet so thats what we will do next.
All the functions that we create are kept in runtime.js file. The convention for waterbear is to keep the functions for this section in alphabetical order so that they are easier to find. We can create a new section for these functions to keep everything nice and neat.
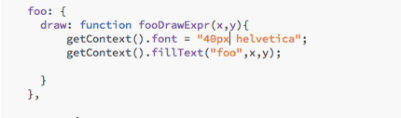
Foo is the handler that is used for finding the functions. The script in runtime knows where to look for the function based on this tag. This why we give the element an “ns” attribute. Building the function itself is pretty easy. We just use the existing libraries from our code base or the builtin browser functions. In this case we have our own function called getContext. This selects the element that our code will be run in (the playground) and then does a fillText operation which is a builtin function for the browser.
We now have a perfectly working block that will print the word foo to the location we give it. We used all existing elements so all the fancy drag and drop functionality is already implemented for our new blocks because of the prototypes set up in waterbear. If you want to take a look at these functions they are within the block.js file. This allows us to do all the transposing during dragging and cloning of blocks and so forth.
Now that you have all the know how, you can go and make some exciting new blocks for waterbear!! Have fun.
–David